


It's here! I am finally done with my post about my brother, Justin and his wife Katrina's wedding! There are several tutorials along the way so be sure to check them out! They are also all listed at the bottom of the post.
When I found out that my brother and his girlfriend were planning on getting married I asked if I could be in charge of decorating the reception. I was so excited when they said I could. I have to say that I am so grateful to my family, the bride and the bride's family for letting me take over and letting me put my imagination into reality. I could not have done it without so many helping hands!
When I found out that my brother and his girlfriend were planning on getting married I asked if I could be in charge of decorating the reception. I was so excited when they said I could. I have to say that I am so grateful to my family, the bride and the bride's family for letting me take over and letting me put my imagination into reality. I could not have done it without so many helping hands!
Now this next part is long and very picture heavy but I wanted you to be able to see everything we did. We were on a VERY tight budget. Everyone always dreams of their wedding being lavish and having all the money in the world to spend on it but in reality most weddings are done on a tight budget. Just because your not on a queen's budget doesn't mean you can't have the wedding of your dreams! We borrowed whatever we could find, used decor out of our own homes, found what we could at garage sales and shopped the sales for the rest.
I will start with the front walk way. This is something I wish I had taken more pictures of! We had lights and white signs lining both sides of the sidewalk. Each sign said something different like happily ever after, I always knew it was you, marry me, for time and all eternity... These pictures are before we got the lights up.


These signs were made out of pallet boards and we used paint I already had so they were FREE!
Sign in Table

We used the table I redid for my sister-in-lawn during the One Artsy Mama Craft Contest as the sign in table. The candle sticks are the only thing not from garage sales. I bought them at a Roberts Arts and Crafts store using a 50% off coupon.
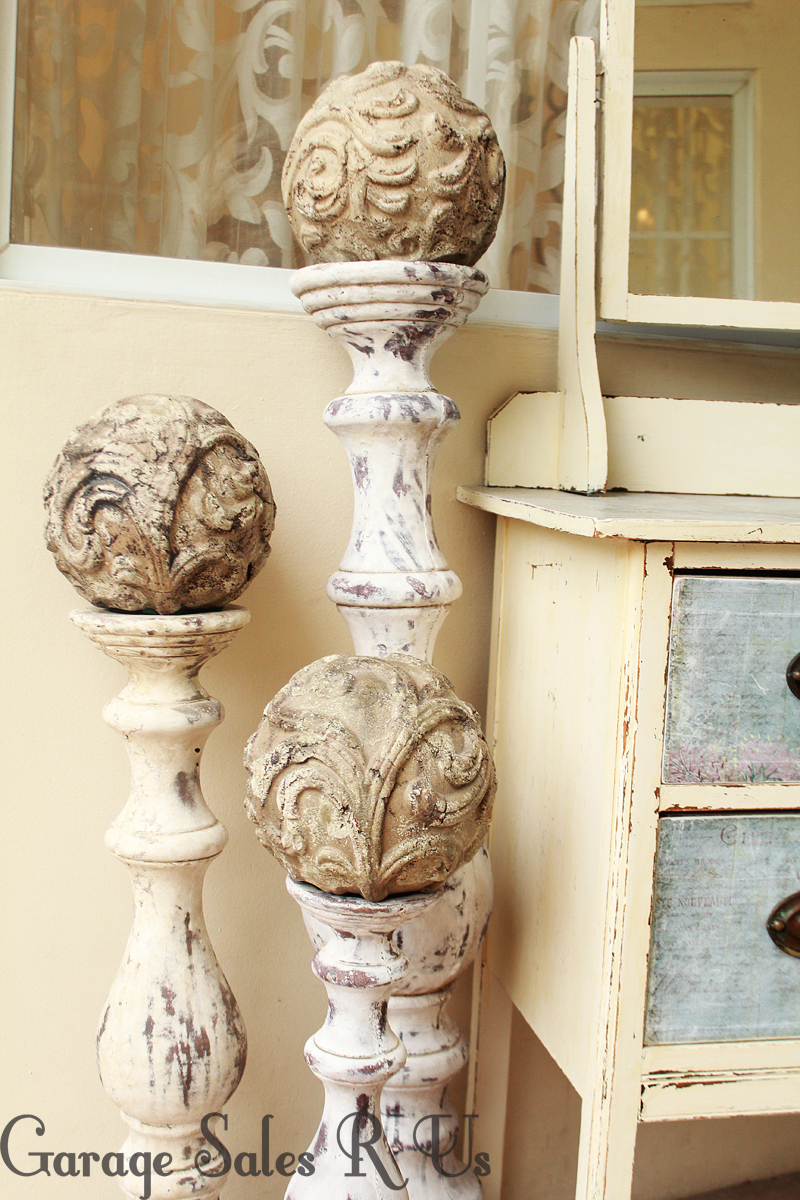
The cement decorative balls I found at the D.I. I bought all three of them for $10 dollars.

The little white pitcher and old books my mom had. The mason jar is one of my Grandmothers. My Grandmother was a major garage saler. She was alive during the great depression so she was a real penny pincher, which in my opinion made her an amazing garage saler. She bought everything from garage sales. Anything that was inherited from her was most likely bought at a garage sale.

Here is one of the frames I have on my wall collage in my kitchen.(click here for that post. I bought this frame and 3 others for .25 cents a frame at a garage sale.
The Front Room
As you walk in to my parents house there is a formal living room on your right side and a formal dining room on your left side.

We put up an arch way in the formal living room for the bride and groom to stand under. We got lucky enough to be able to borrow about 100+ yards of muslin fabric from a friend. The three wreaths were made. You can follow my tutorial HERE for those. The biggest one in the center is the one I keep in the center of my fireplace and cost me about $25 dollars to make the other two smaller ones cost us about $10 dollars a piece to make.
Click here for a tutorial on our DIY Wedding Archway
Click here for a tutorial on our DIY Wedding Archway

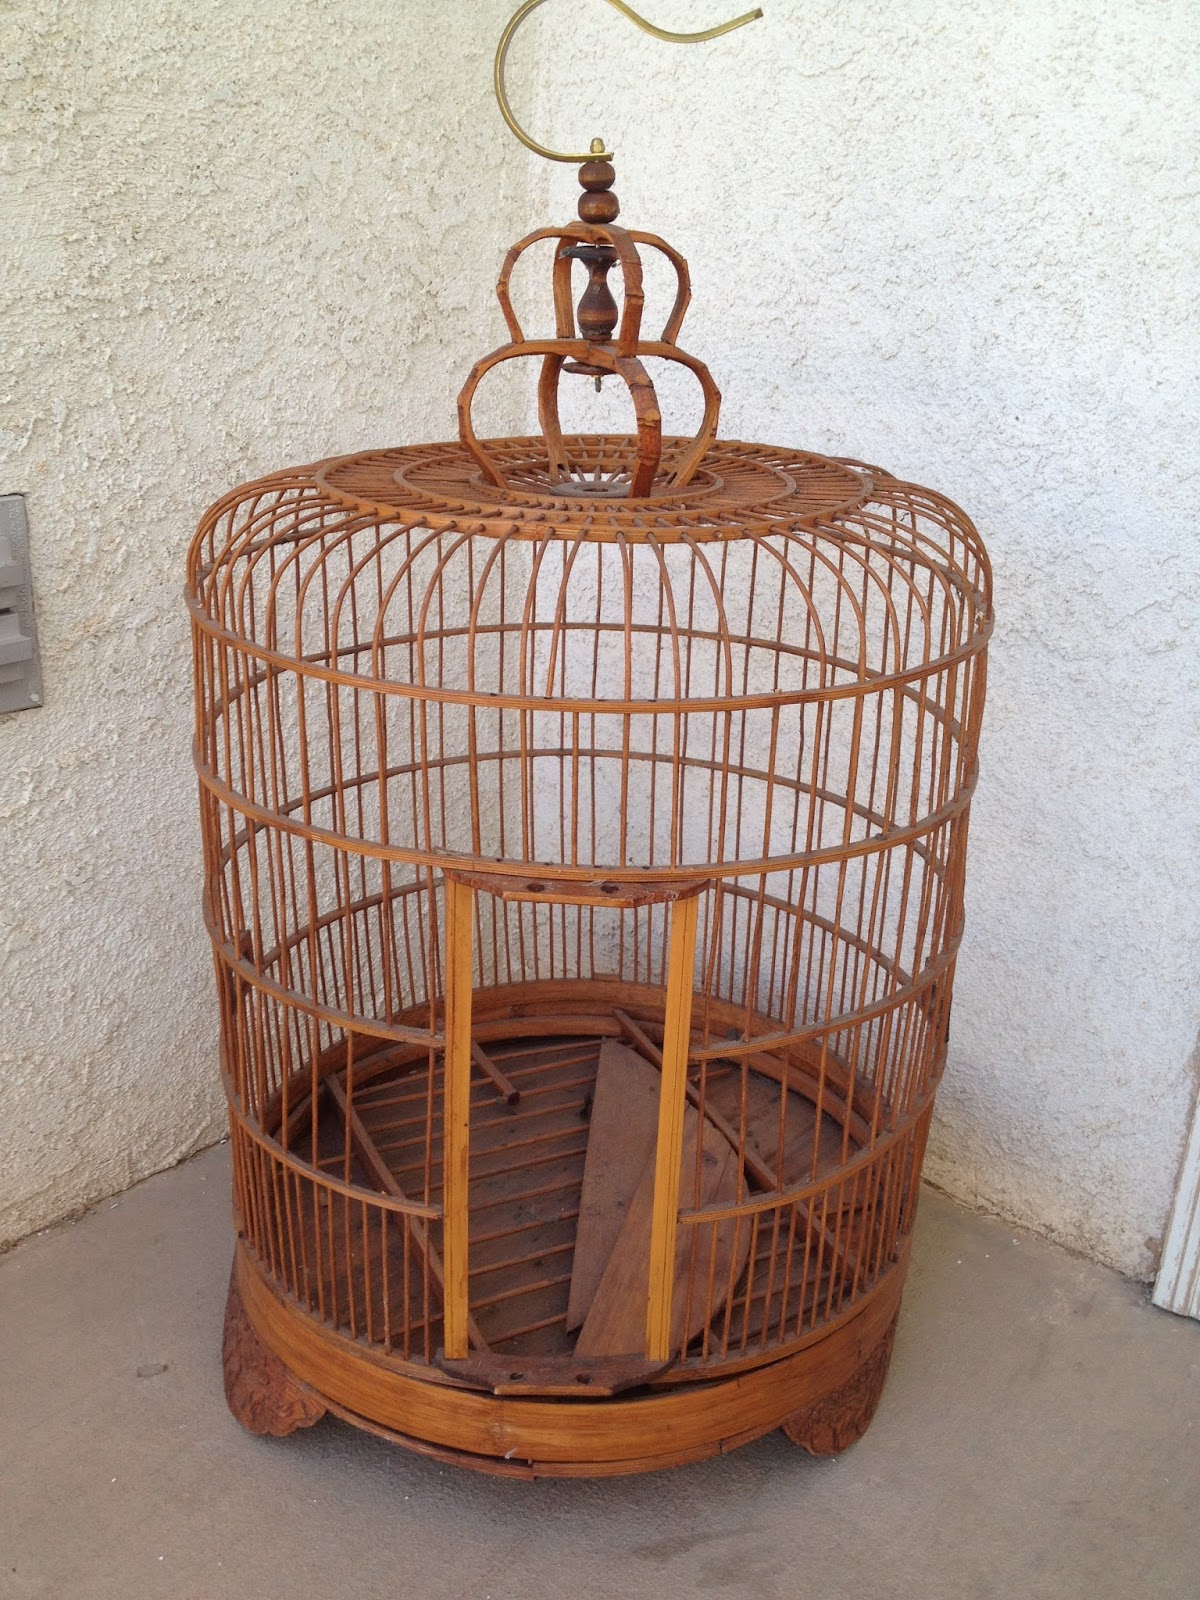
We moved out all the furniture in the formal living room except for my mom's antique piano, which she found years ago at a garage sale and bought for $500. The two tan pots on top are pots I use on my planter shelves. I paid $15 for the big one and $5 for the little one. The gold frame my mom bought at a garage sale for $2 The massive bird cage I bought at a garage sale for $10 dollars.
Gift Table

Here is the gift table. The candelabra I bought from a friend who was moving and selling everything. I paid too much for it but it was one of those Must Haves. I paid $75 for it. The two copper watering can were bought at a garage sale for $6 dollars a piece. Even the log stumps were bought at a garage sale for $2 dollars a piece. The crate was one of my grandmothers.
Table Center Pieces

For our table center pieces we made three small boxes for each table out of pallet board (anytime I say pallet board just think FREE!) We then painted them and put layers of burlap, lace and twine on them with an old skelton key on the center box. My mom had an old bag of keys she got from my Grandma. The lace was also bought at a garage sale for next to nothing. 4 votives were also placed on each table. These of course were also bought at garage sales. If you remember in one of my Week to Week posts I bought 58 votives from a garage sale for $5 dollars! Major SCORE! All the burlap used at the wedding was bought online at a website called burlapfabric.com

Click here for a tutorial on how we made our pallet board center pieces
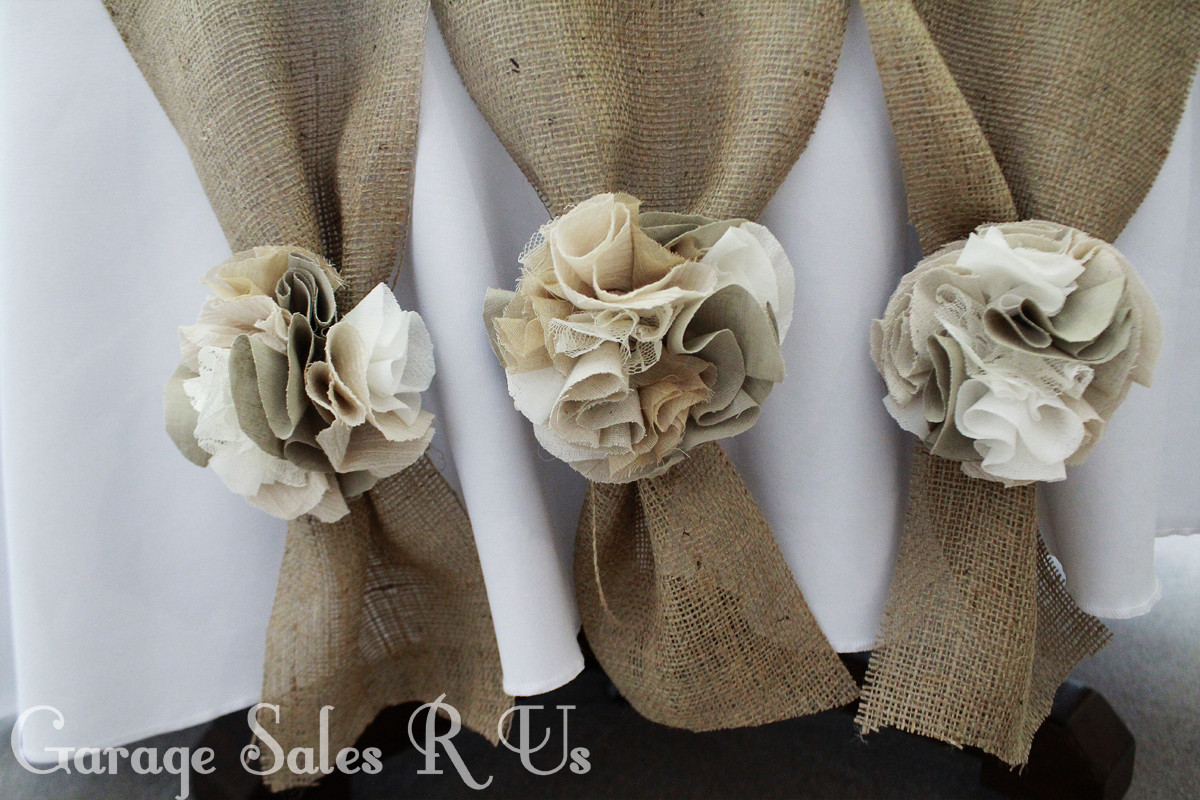
I made bows for the end of the table runners. We didn't get them up on all the tables so I was a little disappointed about that. Our burlap for table runners was also bought off of burlapfabric.com
Chairs

To cover our chairs we used a few different materials. We used tulle to cover about half of them and a white plastic that looks almost just like fabric to cover the other half. My mom bought the plastic at Party City. You can also buy it on Shop Wild things for probably cheaper. We also borrow some yellow tulle from a friend who's daughter had just gotten married a few weeks before and tied bows around each chair. We had to cover about 50 chairs so to make our tulle last longer we turned white t-shirts inside out wrapped them around the top part of our folding chair and then tied a rubber band around the bulk of the shirt to hold it in place. Then we draped our tulle or plastic over the t-shirt and cut it about 6 inches longer than the end of the t-shirt. The bulk of the t-shirt also helped our plastic and tulle look more full and stay in place. To hold everything together we tied yellow tulle bows on the backs of the chairs. Here is also a great website you can find tulle for really cheap http://www.beverlys.com/
Fireplace and Mantel
Here is my Mom's fireplace.

The R placed in front of the mirror was cut out of card board and then covered in moss that comes on a sheet.


The smaller frames match the one that was used on the sign in table and were .25 cents a piece.

These two larger silvery gold frames were bought for .50 cents a piece and spray painted. Here is what they looked like before:


Most of the glass vases with moss rocks inside were borrowed. My mom did find one at a garage sale for $1 dollar. The moss rocks were bought on a Walmart clearance sale for $2.50 a box. The books stacked under the vases were bought at D.I. for $1-2 dollars a piece. To be honest I would not suggest buying books that are purely decorative at D.I. You can find them for SO much cheaper at garage sales but at this point I was out of Saturdays so I had to buy them at D.I. At a garage sale I would not pay more than .50 cents for a book.
The vases used to decorate the bottom half of the firplace were borrowed. The flowers inside the vases were bought on a Jo-Annes clearance sales for .79 cents a stem.

The candles in the fireplace were all ones my mom either had or bought at garage sales for a few dollars.

Cake Archway
Even the cake had it's own archway!

My Mom found 30 yards of sheer fabric on craiglist for $20 dollars. We used most of it to drape the black archway. The teal fabric used to drape the cake stand and under the lace table cloth I found at a garage sale. I bought about 5 yards of it for $2 dollars. The lace "table cloth" is actually a curtain I bought at a garage sales for .50 cents!
Kitchen and Serving Area
We did a bit of a buffet style dinner. On the wall above the food table we did a frame collage of the Bride and Groom. My mom found ALL of these frames at the same garage sale and bought all of them for $10 dollars! There are 25 4x6's, 4 8x10's and 1 11x14. After getting them home we painted all of them and used Scotch velcro hanging strips to hang them so we didn't ruin the wall.

We actually tired to used nails first and it was a total disaster. If one frame moved it would knock another off and then the whole wall would come tumbling down. We almost gave up on this wall when a friend suggested the velcro strips.

This was easily the arrangement I got the most compliments on. If you're going to create a frame collage of any kind it is easiest to lay out your frames on the floor first like we did here.

After the wedding was over the mothers picked a few frames to keep for themselves and the Bride and Groom were able to take the rest home to use as decor in their apartment.

This white picture frame... shutter thing...(not sure what else to call it) was bought at a garage sale for $15 dollars and the scones on each side were $4 dollars a piece at a friends garage sale.

Here is the K and J that were use in some of the engagement pictures. The & sign was made the exact same way the R was made with a cut out piece of cardboard and some sheet moss that you can buy at Walmart of Michaels and glue on to it.
Now on to the back yard where most of the guests were seated
Pallet Board Wall
My mom wanted to section off the left side of the yard so that no one went back there. To do this my sister in law came up with the briliant idea to make a wall out of pallet boards. She put an add on craigslist listing that we needed a bunch of pallet boards. Some one answered that listing and gave us 30 pallet boards for FREE! We actually only used 16 pallet boards for this wall. Click HERE for a tutorial on how to make your own pallet board wall. We also had a friend come over with a paint sprayer and spray the pallet boards white for us. After that we used the borrowed muslin fabric to drape across and down each pallet board.

All the furniture used to decorate the front of the pallet boards was pulled out of my mom's house.

The crate was bought at garage sale by my Grandmother years and years ago. The tin watering can I bought at a garage sale for $1

This old baby carriage is actually my Granddad's baby carraige and something that I love. I had Jaysa take pictures in it when she was little and they turned out AMAZING and are still to this day some of my favorite pictures. The green plant behind the carriage that you can barley see my mom got from a garage sale for FREE! The wardrobe my mom bought at an antique store a long time ago.

This old table was inherited from my grandmother. The old pitcher and bowl my mom bought from a garage sale for $5 dollars and the yellow flowers inside were bought on a Jo-Annes clearance floral sale.

The long Hope chest was again inherited from my grandmother. The little chair on top of that is another piece my mom had laying around the house. The green plant next to that was bought at a garage sale for $3. The desk was actually my Dads desk when he was a kid and bought by my grandmother from a garage sale. The tin wash basin I bought at a garage sale for $7 dollars and the flowers inside were also bought at a garage sale for .10 cents a stem. The iron globe on top of the desk was bought for $3 dollars at a garage sale.
Frame Collage II

Does anyone remember that long sheet of brick I bought at the All Things Thrifty Garage Sale for $3 dollars? Here is what I did with it. I painted it white and sanded it down a bit to make it look old. Then Coltin and I hung a frame collage on it using the velcro strips we used on the wall collage in the kitchen.

All the frames used on this board are frames my mom and I had that were bought at garage sales any where from .25 cents to $3 dollars.

The platter in the center of this frame was bought at a garage sale for $5 dollars

This was such a fun and cute way to display the Bride and groom's pictures.
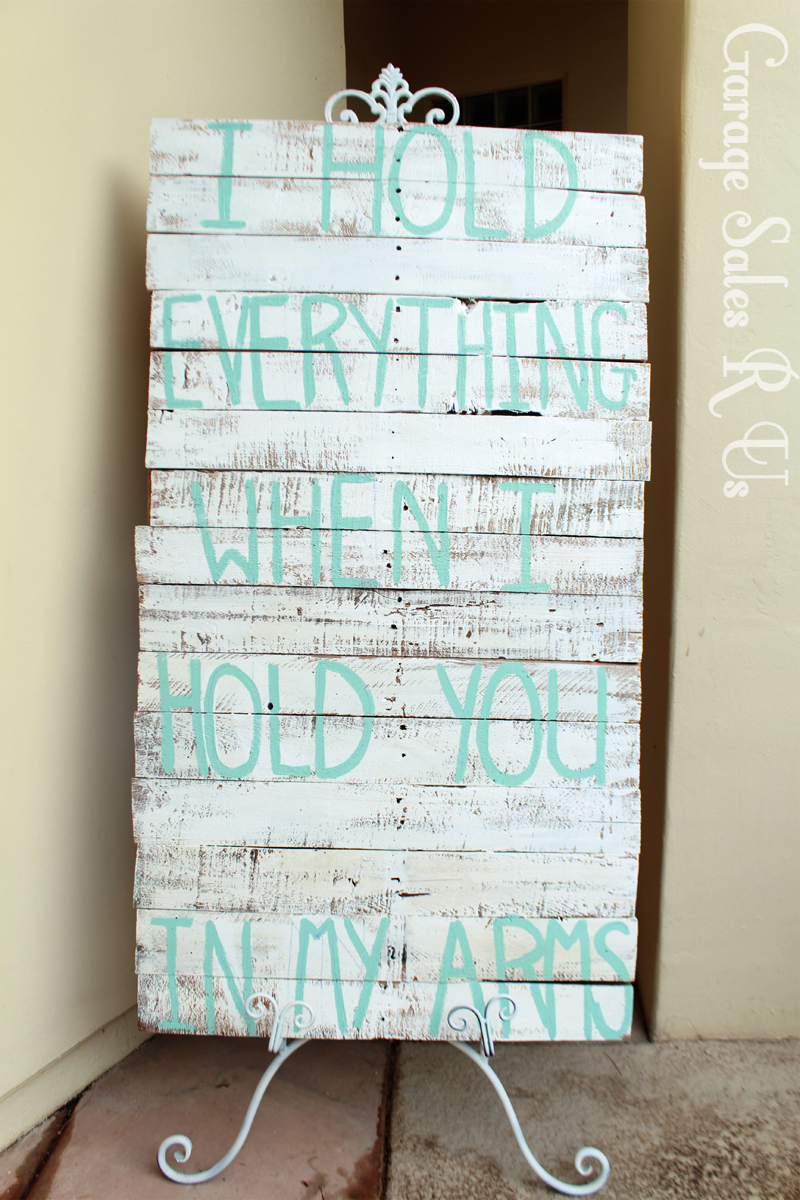
While C.J. was making the signs for the front entry way I also had him make a really big one. I then had my sister paint this quote on it. We used it as decor in the back yard. I had originally wanted to use it on the front porch but decided it was too big.
We set up a few tables out in the yard under our big cedar trees. We had originally planned to section off this part of the back yard but since we needed some more room for tables we decided that this area also needed some decorating.

The old window hanging on the tree trunk was bought at a garage sale for $5 dollars. It had some really ugly floral art in it which I had my brother cover up with burlap and then run lace along it so we could close pins pictures on to it.
The crates to the left of the tress are crates my parents have kept from my Grandfather's old produce company. (No I am not campaigning for Romney.) Romney is actualy my maiden name. My Grandfather owned a produce company that was called Romney Produce Company. My parents love these old crates and use them all around the house.
Here is a before picture of what the old window looked like:


My sister brought her old type writer down so we could use it in the decor. It added such a cute touch! She bought it on ebay! The crystal vase with the pouring spout was bought at a garage sale for $1 dollar! The old books are books my mom already had.

Look how cute this is! So cute Kristin!
We also have two other large cedar trees in the back yard so I placed my Mom's antique church pew between them. My mom bought this at an antique store a long time ago for $75 dollars.

The pillar to the right of the pew was bought at a garage sale for $2.50! It was a mustard yellow at the time but was painted white for the wedding. The frame on top of the pillar is one that was used in the couples engagements. It was originally a mirror but I slapped some chalk paint on it and we were able to write the wedding date on it for pictures. On the left side of the church pew I used a small square chest my mom found at a garage sale for $3 dollars. The vase sitting on top my mom bought for $1 and the flowers inside I picked up for a few cents at a garage sale. Here is a picture of the pillars being painted!

We actually bought two of them for $5 dollars but we only used one in the decor here.
This frame was bought at a garage sale for $1!

Here is it's before picture:

I painted it and lined it with cardboard and cover it with burlap and lace so we could hang some pictures of the bride and groom on it.

This was easily one of my favorite arrangements of the wedding. I loved the way the lights and pom poms provided a hanging canopy below the tress.
BBQ Area
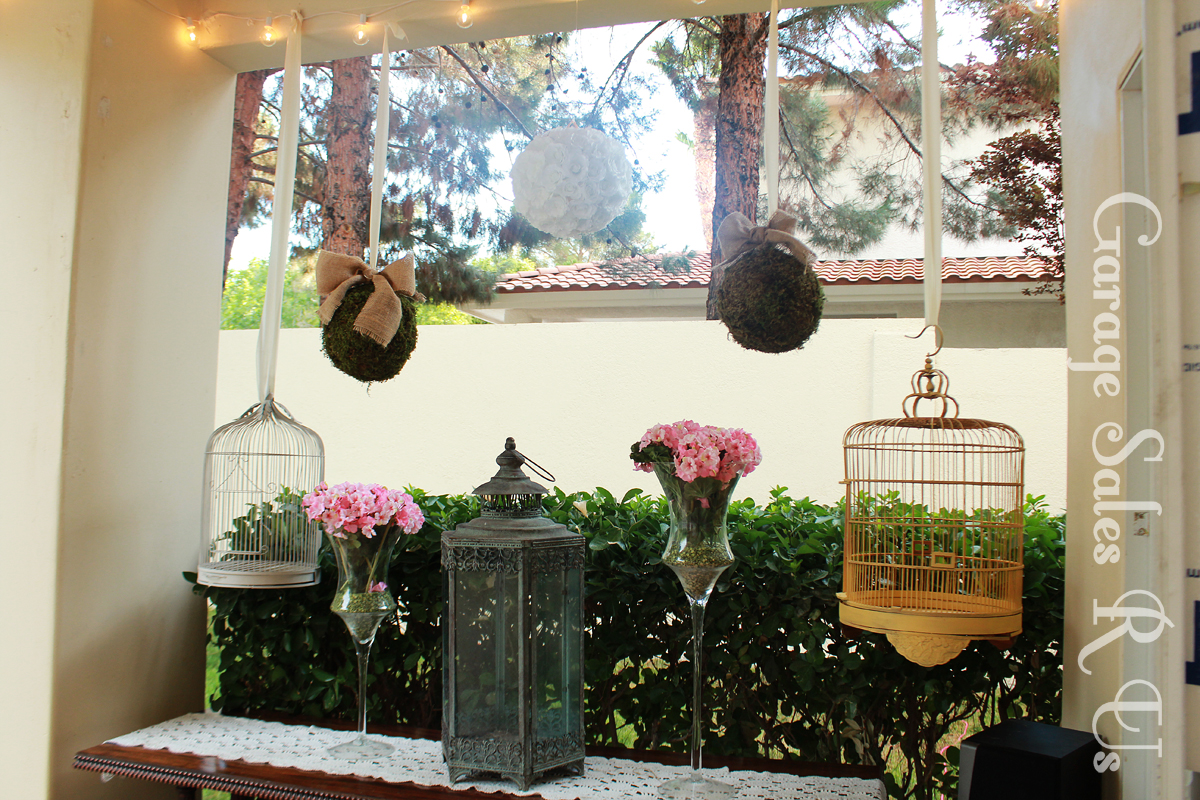
Normally this is where my parents BBQ goes. It was a bit of an eye sore so we moved it and replaced it with an 5 foot long skinny antique entry way table my mom picked up from a garage sale for $15 dollars. To decorate the table I used 2 bird cages I found at garage sales for $3 dollars a piece.
I spray painted the bird cage on the right to match our decor a little better. Here is what it looked like Before:
And after:

The two hanging moss balls were also found at garage sales and recovered in moss. I probably only paid about .75 cents for both of them.

The white rose ball was actually a lantern that the bride found at the dollar store and re-covered with white roses used at my wedding. Such a cute idea!

The large glass lantern sitting in the center the table was something I splurged on. I bought it at Robert Craft Store with a 50% off coupon and paid $30 dollars for. The two vases on either side of it I found at D.I. and bought for $5 dollars a piece.
Outdoor Bar

For this arrangement I used large vases and filled them with decorative balls found at garage sales. I then added white hydrangeas to fill out the top. If I had to put an estimate on how much we spent on decorative balls for these center pieces I would say about $10 dollars. Decorative balls are so expensive in the store! If I had had a $10 dollar budget and was trying to buy these in the store I would have been able to buy 2 possibly 3 if I was really lucky. However these are so cheap at garage sales! I usually buy a set of 3 or 4 balls for $1!
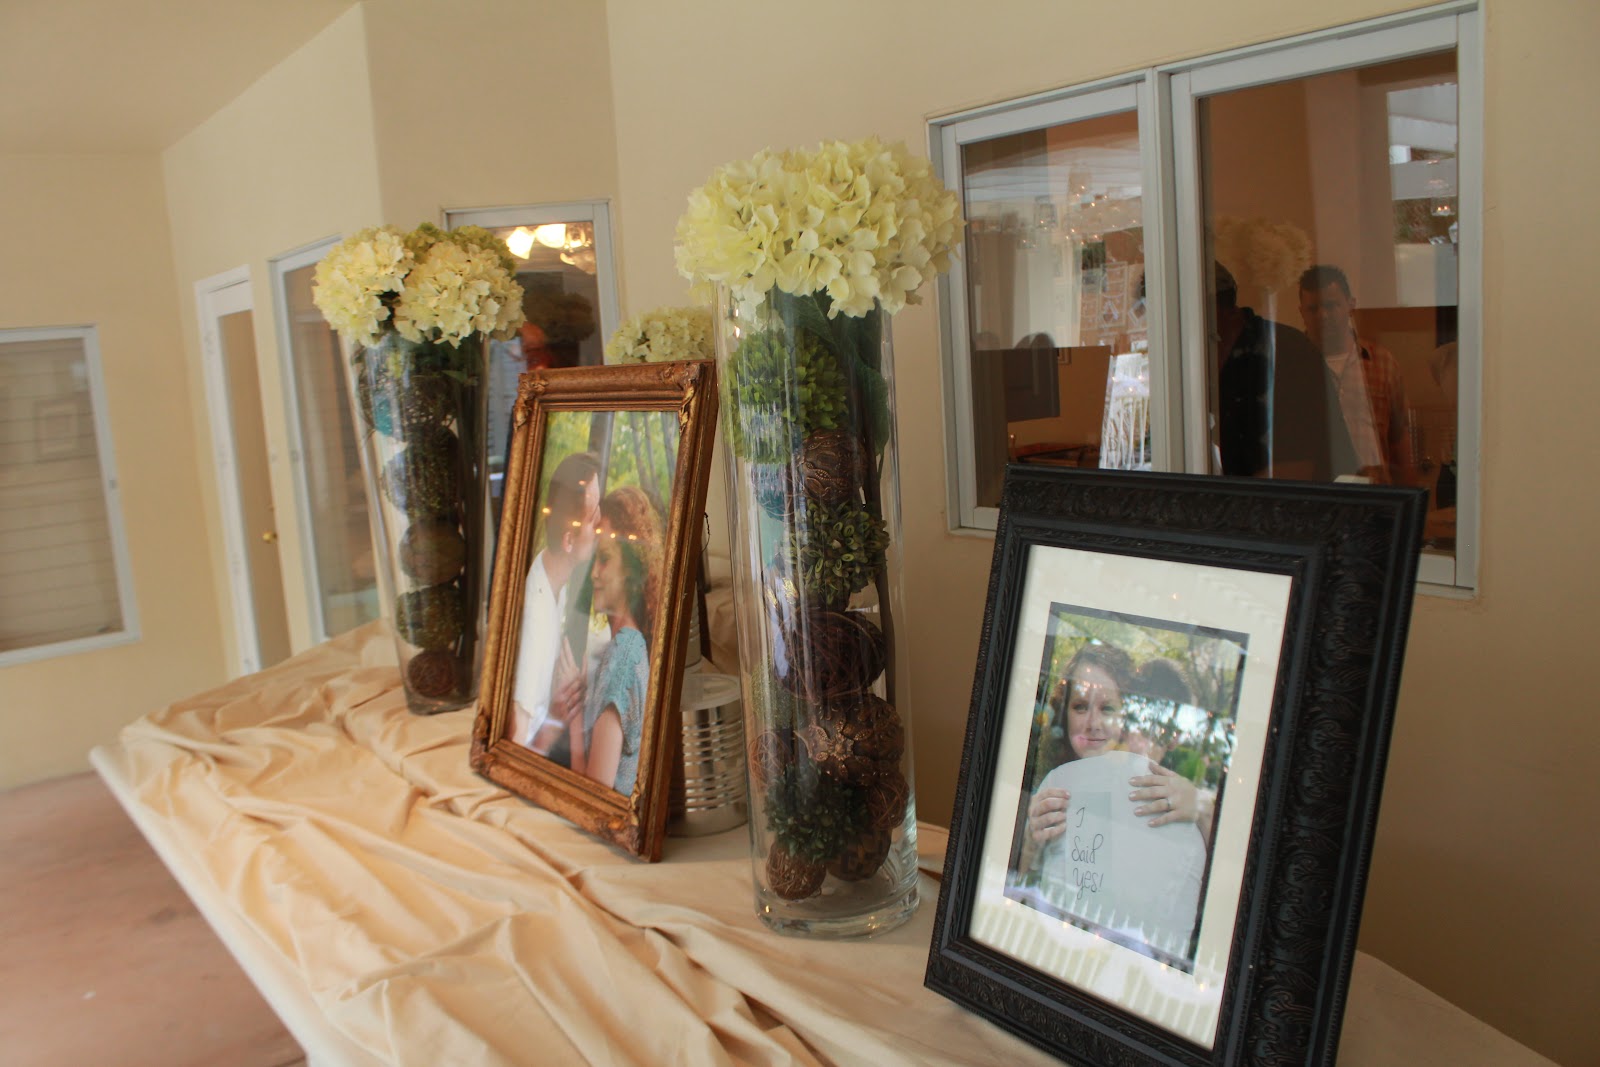
The center vase I bought at a garage sale for $5 dollars! The other two large vases were ones my mom had from previous weddings. Vases this size are so expensive. You can easily spend $40 to $50 dollars on one of them!

The two black frames I bought at a garage sale for $2 dollars a piece. The gold frame in the center was one my grandmother picked up at a garage sale that was later inherited by mom.

We also did a mason jar ceiling. Mason jars are so popular right now but PLEASE do not buy them from the store! We found enough mason jars at garage sales to do the whole ceiling and paid about .10 cents a piece for them. We used about 50 mason jars for this ceiling, which means our total cost was $5 dollars! We were also able to find a lot of the candles that went inside at garage sales!
Pool Fence

We used a lot of tulle in the wedding. We used it on the pool fence and to drape chairs with. I found a pretty big box that was stuffed with tulle at a garage sale which helped a lot. I only paid $2 dollars for the whole box. They rest of the tulle we used was left over from my wedding. If your looking to buy tulle HERE is a great website to find it for dirt cheap!
I know this was long but thanks for hanging in there are reading!
Here are those links once again:
Click here for a tutorial on our DIY Pallet Board Center Pieces
Click here for a tutorial on our DIY Wedding ArchwayClick here for a tutorial on our DIY Pallet Board Wall
Click here for a tutorial on our DIY Walkway Wedding Signs
Click here for our DIY Monogramed Moss Letter
This wedding was a lot of work as most wedding are. I am especially grateful for my Mother, my sister-in-law, Meghan, my sister, Kristin and my right hand man and little brother Coltin! Thank you for all of your help!

Love this picture of him painting the frames we found at garage sales. Some how he got paint all over his chin and in his eyebrow! Coltin was there with me every step of the way to make sure all my ideas came through and never complained. We make an awesome team. Thank you Coltin!

wow.. that is amazing! so talented! I'm sad we were out of town for this. I would have loved to have seen it in person. Wow. Can i hire you when that day arrives (many years from now haha) Congrats. Absolutely adorable and beautiful wedding reception.
ReplyDeleteI love everything you did. I especially love that there were so many pieces from different members of your family.
ReplyDeleteSTUNNING!! I can't believe you did all this on the cheap and it looks SO classy and beautiful! Fantastic job!!
ReplyDeleteGorgeous! You have the perfect beginnings of a business renting out wedding decor. Think about it!
ReplyDeleteWay to go Robin! A wedding reception is a huge undertaking but you made it happen beautifully. You're a super star!!
ReplyDeleteYou did a great job! So much work, I know, because my daughter got married 8 months ago and we did everything ourselves (most everything). Love your treasures!
ReplyDeleteWell please don't take this wrong but my DH hates you right about now. HEHEHEHEHEHE We still have a daughter that "needs" to get married. So I hauled him out yard selling this weekend. Now mind you when our kids were young we went every weekend. It helped with jeans for alot of boys, and "new" toys to keep the little one's entertained. Anyways back to the subject, so I started looking for glass jars, glass pitchers, glass anything. He asks in a very straight face what in the world has happened to you? I explained I found this blog, where she did her Sisters reception for very minimal costs. So me knowing that we still had one wedding to go I thought I better start on it now. So tonight I pulled up your blog and sat with him going over picture after picture. Then he smiled at me and said now I see...............
ReplyDeleteYou did an amazing job!!!! You arre one talented lady!!!!
ReplyDeleteThe blogs are really appreciable and one can trust the knowledge and information provided in the writing. The article you do produce on a weekly base really the best. I have found a similar website magnetic signs visit the site to know more about sinking.
ReplyDelete