TutorialsPhotobucketSponsorsPhotobucketPhotobucketPhotobucket

PhotobucketPhotobucketPhotobucketPhotobucketPhotobucket
Photobucket Photobucket Photobucket Photobucket

Saturday, April 14, 2012

DIY Frame

A while back my friend, Melissa, came to me and asked if I would help her make a frame for her family picture. She had seen this one in a store and loved it but it was too pricey. It was close to $100 dollars! After going to look at it myself I knew we could make it for cheaper and even cuter.
So here is how we did it!
I went to Home depot and bought 2 1x6x8 pieces of wood, and a large piece of this rope trim molding. I prefer to buy wood at Home Depot because they let you pay by the foot Lowes makes you pay for the entire piece of wood even if you don't need the whole thing.
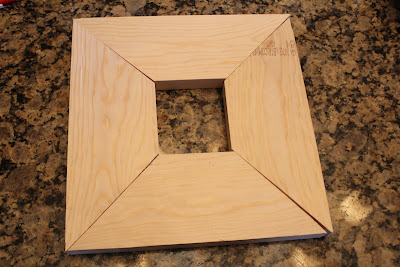
Then I brought it home and had C.J. cut our wood and trim at the right angles.

For a standard square or rectangle frame it is just 90 degree angles. If you don't have access to a miter saw don't give up there are other ways to cut your angles. You can use a miter box, which looks like this.
I found this miter box at homedepot.com and it cost about $15 dollars. Here is a great tutorial I found online for using a miter box. Click Here. If you will never use a miter box again don't go out and buy one. The Home Depot where I am has a saw they allow customers use and pay .25 cents per cut. This would be much cheaper than buying a miter box.

You can make your frame any size you want. Just remember that when you are printing your picture out you may have to ask your photographer to make it a certain size or you can just print it larger than you need and cut some of the background out so that it fits in your frame. Melissa's frame was 28x32 and the opening is 17x21
We even had enough left over for me to make a little frame!
My frame is a 10x10 and my opening is 3x3
If your cuts are not perfect dont worry about it. Ours weren't either. Since we are covering the wood no one will see your cuts so it's not a big deal. You just need to make sure the pieces that are across from each other are the same length so that your frame is nice and symmetrical. If you need to you can take a file and file down some of the imperfections with the cuts.
Then C.J. took his nail gun and shot a few nails into each corner of the frame.
Melissa's frame is really big. It took up my whole kitchen island and I had to stand on my barstool just to get a picture of it.
We also screwed brackets to the back of the frame on each of the corners where our pieces met to make sure our frame was nice and sturdy.
Then we filled the cracks with a wood filler.
You will have to work the wood filler into the cracks with you fingers.
After your wood filler dries, sand it down so it is nice and smooth.
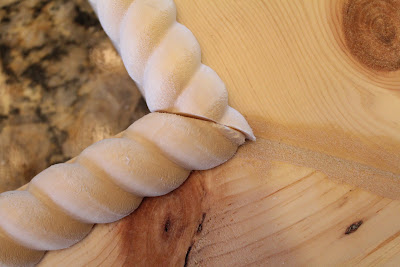
Now you will do the same process for the trim pieces.
Cut your angles and lay them out to make sure they are even.
If they don't line up perfectly thats ok!
All you have to do is file the edges down.
Here is my frame.
It would also be helpful if you labeled your wood and crown molding pieces so that you don't have to refigure everything out when it comes to glueing your molding on.
After that you are ready to cover your frame. We used paintable wallpaper but you can use scrapbook paper, fabric or whatever you want!
Before you lay your frame on top of you wallpaper to trace the cut make sure you like how your wallpaper is lining up on your frame.
Mine was really easy cause it was so small but Melissa's was a little harder because her frame was wider than my roll of wallpaper so we had to cut it into two different pieces.
After your paper is cut you can just follow the directions on how to apply the wall paper. If for some reason you don't have them all you have to do is soak your paper in water for about a minute and then set it out on your counter for a few minutes before applying it to your project. When you are applying your wall paper take a credit card or something with a straight edge and gently work all of your bubbles out by lightly scraping from the center of your project to the nearest edge. This could get messy. You will be pushing some of the glue out from the edges but if your working out the bubbles lightly your project should be fine.
Here is Melissa's frame before being painted, stained and glazed.
She even took an exacto knife and cut about 1/4 an inch of the wallpaper off the edges to give it more of a distressed look. You could also sand the wall paper down which is what the people did on the original frame that inspired this project. After your wallpaper is dry you can then put a coat of paint on it. Melissa painted hers cream and did a dark brown glaze over the top. I will be putting mine in my girls bathroom so I needed it to be a little more girly. I painted mine a teal and lightly brush a Martha Stewart silver metallic color over the top. I didn't want a lot of silver so I took a dry paint brush and after lightly dipping my brush in my paint I wiped it onto a paper towel. Then I gently brushed it over my wallpaper so that it covered the raised portion of my wallpaper. For a tutorial on how to paint your paintable wallpaper Click Here.

After your frame is painted your next step will be to paint your crown molding pieces and then apply them to your frame. We simply used wood glue to glue ours on.
After you glue on your crown molding, fill in the cracks with wood filler.
I actually prefer the Elmers wood filler over the Minwax!
After your wood filler dries sand it down the best that you can so that it is smooth and then paint over the filler.
You will also need some sort of brackets or wire to hang your picture. I am just putting mine on a shelf so i didn't put anything on mine but Melissa adding some brackets and a wire to hang hers.
Here are our final projects!
Melissa painted her molding a dark brown and then sprayed her project with a spray polyuratane to give it a nice sheen. Melissa used the wallpaper I had on hand from my fireplace (click here to see that project) so I just guestimated on the amount she used and how much she owed me for materials but the total cost of Melissa's project was just under $25!

Here is my project. The total cost of my project was about $6!


I absolutely love how my frame turned out however I will say this. If your doing a large frame like Melissa this is the best and cheapest way to go about accomplishing your project. If you are going to do a smaller frame like I did you may be able to find a frame at a garage sale that you can repurpose which would be a lot easier than building your own frame.
After finishing my project. I found these frames at a garage sale, 5 for $3 dollars. It would have been much easier and cheaper to apply wallpaper and crown molding for the same effect.

I am linking to these parties:


Sumo's Sweet Stuff


DIY projects and crafts


Friday, April 13, 2012

Kids's Corner

I know Spring has arrived but here in Utah we still have a few cold days every once in a while so here are a few last winter outfits before we move on to warmer weather!

Does anyone remember when I bought this cute little sweater a few weeks ago?
Here is Jaysa in it! Click here to see what else I found that week!
I bought her sweater for $1, her black leggings for .50 cents and her black shoes for .50 cents. All of them are from garage sales! Her total outfit cost is $2!!! DPWF of .20 cents!
For this outfit I spent a total of $7 dollars. Jaysa's purple pants were $3.99 from Savers, her shoes were $1.99 from Savers and her shirt was $1 from a garage sale. DPWF if .70 cents!

Paisley
I love this picture of Paisley!
Her vest I bought a few weeks back and paid .50 cents for it. Her jeans were $1 from a garage sale and her little pink sandals were .50 cents. Her hot pink long sleeve shirt I bought in a Down East clearance sell for $3!!
Her total outfit cost is $5. DPWF is .50 cents!

Paisley is wearing the same jeans and hot pink sandals from the picture above. Her shirt was $1 at a garage sale making her total outfit cost $2.50 and DPWF .25 cents!
I couldn't help myself. I had to put both of these pictures on
It wouldn't be a picture of Paisley without a goofy face!
I bought Paisley vest for .25 cents!!!!!! Click here to see all the other clothes I bought along with the vest. Her red ruffled onesie is a Baby Gap onesie. I bought it at Kid to Kid but I can't really remember how much I paid for it. I remember that it was more than I wanted to spend but I needed a cute red onesie at the time so I forked out the money. I believe I paid around $6 dollars for it. Her pants were bought at a Children's Place sale for $5 and her shoes were bought at a garage sale for .50 cents and still had the tags on them for $9.99! Her total outfit cost is $11.75. Not my best but still very cute and much cheaper than store prices! DPWF is about $1.20.


Thursday, April 12, 2012

Garage Sale Leotard


Here is Jaysa at gymnastics in her $1 leotard!
Jaysa absolutely loves gymnastics and loves her teacher Devin! Every time I get her in the car and tell her its time to go to gymnastics she yells "Yeah! We get to go to teacher Devin's house!" (she thinks the gym is his house) So cute! He is leaving in May and we are so sad!

Ferguson Garden of Eden

C.J. and I have been wanting to start a garden this year. C.J. parents have one of the most amazing gardens I have EVER seen. They have flowers growing in an old claw foot tub and in old cast iron beds and spices growing in old sinks and old mail boxes. I just love everything about it. So when C.J. and I imagined ourselves gardening we always imagined having a garden similar to theirs. However planting season really crept up on us and we were no where near ready. So we gathered up all the pots I had been collecting from garage sales, filled them with dirt and planted tomatoes, zucchini, squash, jalapenos, onions, strawberries, bell peppers, and asparagus. Not the garden we were hoping for but a good enough start for now. Our girls helped us plant and loved digging in the dirt!!!
Jaysa
Jaysa dress was a $1 at a garage sale!

Paisley
The total cost of Paisley's outfit is $1!
.50 cents for her shirt and .50 cents for her jean shorts!
My sweet girls

Monday, April 9, 2012

Well Look at That

C.J. has been really working hard on our yard to try to make it look beautiful. Remember last week when he bought all of this for $3?
Well look what we found at Star Nursery while we were deciding what plants we wanted in our garden!
Here is a close up of the tag
$30?!?!?!?! I can't believe this costs so much! We saved our selves $29 dollars!

Check back tomorrow to see what we found this weekend!

Sunday, April 8, 2012

April 7, 2012

Here is what we found this week!
Little summer dress for Paisley- $1
Another light fixture- $2.
We are almost done updating all our light fixtures!
Pot for the garden- $2
silver sparkly scrapbook letters- .50 cents.
It said $1 on it but I asked her to go down to .50 cents.
two cans of spray paint- .50 cents a piece!
Porcelain Easter bunnies- .50 cents.
Ok, I know these are a little goofy but I have a plan for them. My post about it will be a little bit after Easter but it will be so cute!
stuffed animals- .25 cents a piece.
Two of them still have the tags! My girls were so excited when I handed these to them! They LOVE their stuffed animals and think the more the merrier! When they are a quarter a piece I can afford to let them have as many as they want.
I found another antique high chair! You don't find these very often and I have found two in the last month! This one was $7! After I bought the first one I couldn't decided what color I wanted to paint it because I wanted to be able to put girls and boys in the seat. I really wanted to do it red but didn't think it would be as cute when I wanted to take pictures of girls. Now I can paint one red and one pink!
DVD's for $1!
That's better than Red Box! Red box went up so it was cheaper and you actually get to keep it! I bought Seven Pounds and Blood Diamond. Just remember to always open the case to make sure the movie is in there and that it's not too scratched up. These are both great movies, which meant movie night for us!!!!!
We watched Seven Pounds and of course I BALLED my eyes out!
Don't you love C.J.'s smile!!!


OTHER AWESOME DEALS
Dream and Believe signs- $2
This outdoor furniture padding is so cute! I forgot to ask though. The man was very reasonable in his prices though so I can't imagine they were too much!

Pot's all between $2-$5 dollars
Dresser and two night stands.
When I asked the guy how much he wanted for the dresser and two night stands he said "Oh, I don't know, what do you think like $20 for all of it?" When you have a seller that says this that means they usually don't have any attachment to the item and are willing to let it go for cheap. ALWAYS, ALWAYS ask the seller to go down when they say something like this!
These would have been a cute little redo but one of the drawers was a little hard to open and C.J. wasn't sure he could fix it so I passed it up. If I was going to buy these I would have offered the man $10. If he thought that was too cheap I would have come up to $15 and I am almost positive he would have taken that.
Cute back packs for your kids- $5!
Decorative wall boxes still in box - $3

Games- anywhere from $1-$3 dollars.
When my niece was going through all of her radiation and chemo treatments I bought her lots of games at garage sales and sent them to her each week to try to give her something to look forward to. Sometimes this can be risky because it's so easy to loose pieces. Just make sure to check the box and make sure all the pieces are there. If you don't have time to check the box look to see if it was kept in good shape and if the loose pieces are in bags or anything. This is usually a good sign that the game was take care.
White lights, still in the box- $2 dollars a piece.
Brand new boots- $65.
Boots are so expensive! You can spend several hundred dollars on one pair of boots!
These are expensive for a garage sale but a good deal if your planning on buying boots anyway.

Kathy Purses

$5 dollars a piece


Cool fun chair. I have never seen a chair like this. Eventually I would love to learn to reapolster something and if today was that day this would have been fun but right now I don't feel like I can take that one. One day I will!
Water storage-$10 a piece!
These are great for your food storage and he had several more.
Here are some fun Nerf guns for the kids. The big ones they wanted $40 for the big ones, which in my opinion was a little high but the smaller guns were $1 to $2 dollars. Thats a much better price.

Craft Garage Sale! Garage sales are a great way to find crafting items for cheap!
Cute vinyl sayings and quote for -$2!
There were boxes and boxes for Stampin up products!
They were anywhere from $3 to $5 dollars.
Stampin rollers for .50 cents
The ink pads were a few dollars a piece.
They also had packages of scrapbook paper for $3!
storage jars-$2
I was in a show room the other day and saw a laundry room I loved and they used jars like these for storage and decoration. Here it is
I would love to redo my laundry room like this. If I get to I will be collecting jars like these at garage sales for cheap!

Large pot- $3
Here is a yard sale with just baby girl clothes! So many clothes!