CHECK OUT FARMHOUSE TABLE #2 WITH AN EASIER TUTORIAL AND CHALK PAINT! (HERE)
This is a post I have been meaning to finish up since I started this blog. It's crazy to see how far we have come since this post!
This is a post I have been meaning to finish up since I started this blog. It's crazy to see how far we have come since this post!
Farmhouse Table
I LOVE this Farm house table I saw on Pinterest but after looking at the tutorial I knew there was no way I could complete the project. My husband and I had never built anything in our lives nor did we have the right tools to do this. As I sat on my couch a little disappointed I decided there had to be an easier way for those of us who are not builders!
Pinned from The The Tommy and Ellie blog
I went to Desert Industries, which is a lot like a Good Will or Salvation Army. I love these second hand stores because they are the next best thing to a garage sale and you can find some awesome deals! I found a table with legs I liked for $20. Then I came home and had C.J. unscrew the table top so it looked like this.
Sorry I completely spaced the before picture!!! The legs to my table were painted brown so after beating them up a bit (you will use the same distressing techniques you use for the table top which I go into detail about later in this tutorial) I repainted them a cream and after letting them dry put a glaze on top. Glazing gives your projects a nice antiqued look. You simply paint it on and then wipe however much you want off. You can get glaze at Lowes or Home Depot but remember glaze has to be tinted. If you buy just straight glaze it will be a clear color. You can either have the people in the paint department tint it for you with your paint color choice or you can tint it yourself. If you are going to be doing lots of projects where you might want to use different colors of tint you might want to do it yourself, otherwise I would just have the people in the paint department do it for you.
Here is me painting the glaze on first. I prefer a brown tint over black most of the time so I just went in and picked a brown I thought would work well with my project. After you wipe your glaze off as much as you want and that layer dries then brush a polyurathane coat on to give it a nice top coat that is wipeable.
Now for the table top.
We went to Home Depot to pick out our wood. Normally I prefer Lowes over Home Depot but when it comes to wood I always go to Home Depot because they let you buy it by the foot. At Lowes you have to buy the entire piece of wood even if it is longer than you really need it to be. When you are picking out your wood, pick out the most unique pieces you can. Pick pieces that have lots of knots and other imperfections. When you stain the wood these imperfections will be brought out giving it that barnwood look we like. One very important tip I would give you when choosing your wood pieces is to lay your wood out while you are at the store and make sure the pieces fit nicely next to eachother. This will make it easier for you when it comes time to put your wood together to make your table top. We ended up buying 4 8x1's that were 6 feet long each.
Distressing the wood.
There are so many ways you can distress wood. To be honest there really isn't a wrong way to do this. All your doing is beating up the wood. I looked at several sites on how to distress wood but here was my favorite tutorial I found on Youtube.
After watching this video we did our best to make similar tools.
Here is our chain. C.J. linked the screws and bolts into the chain using washers to make sure they didn't fly out when he would swing the chain. TIP: If you are staining your wood use a plain silver chain that is not painted. We used a black one and it left small black marks on our wood from the black paint on the chain.
Here is our worm hole tool. C.J. just nailed a few nails close together into a piece of wood that fit in his hand well. There were about 25 small nails that were very close to each other in a piece of 2x4 that stuck out of one end.
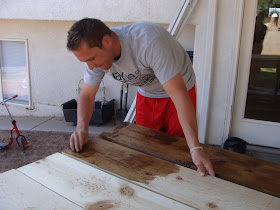
So with these makeshift tools we (and by we I mean C.J.) started beating up the wood. Each tool made a unique dent or chip in the wood so was not uniform and gave it more of an authentic look.
Here is C.J. using the screw driver to make the wood looks like it had cracks in it.
He mostly did the end pieces with cracks because that is where you would normally see real cracks in the wood. However, he did put a few cracks throughout the middle of the pieces. Then he beat up the wood with his worm hole tool. This was my favorite distressing technique because he would really concentrate on one area which really helped to bring out an aged look in our wood.
After fully distressing our wood we started with the stain. Staining is an easy way to make wood look beautiful! Just take an old rag, dip it in your stain and rub it on your wood until it is all soaked in. We also put a few coats of polyeurothane on it so it could be easily wiped off for all the future messes.
Now comes the hard part.......
If you laid your pieces out in the store to make sure they fit well together and didn't let them sit around for a month before you started your project this step shouldn't be so bad. C.J. and I did not lay out pieces in the store and we let our wood sit for several weeks before we started this project. By that time one of the pieces of our wood had warped. Instead of going to buy a new piece we decided to use it anyway. If I could go back and do it all over again I would have bought a new piece of wood. For some reason the left end of out warped piece of wood started to lift. I am not really sure why but it made connecting our pieces together really difficult. To connect our wood planks C.J. drilled holes for dowels and used wood glue to glue the dowels in to keep the pieces of wood together. Here is a picture that might explain this process a little bit better.
Because of our warped piece of wood the hard part was keeping the wood together and tight. We had to get 4 kreg jigs to hold our wood pieces together until the wood glue dried. This WILL NOT happen to you if you lay your wood out in the store and start your project right when you get home! When I was reading about this project on the Tommy and Ellie blog they used one kreg jig. Because of our one warped wood plank we even had to lay the original table top on top of our four pieces of wood in order to keep the wood in the right place.
After your wood glue is nice and dry you can then screw the base of your table to it's new table top! The table top screws on the same way that the original top was on there. Using the original screws would be the easiest and cheapest way to accomplish this. However, if your not able to just make sure your screws are the right length and not too long otherwise they will come up through the top of your beautiful table you just worked so hard to make!
Here are a few pictures of our wood after being distressed and stained.
You can see all the dents from using the chain.
In this picture you can see the cracks C.J. made.
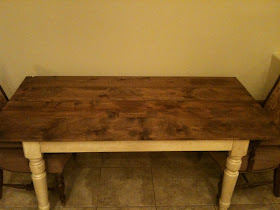
Here is the piece of wood we had such a hard time with. In the end everything turned out as planned and I have a new beautifully old looking farmhouse table!
Here it is after getting the wall behind it decorated.
The total cost of my table was about $45 dollars! I spent $20 on the base on the table and $25 on the four wood planks and dowels.
To see the post on my wall collage and how much I paid for everything click here!
To see the post on my wall collage and how much I paid for everything click here!
This is my first project that has been featured!!!! I am so excited about that! Thank you Allison @ A Glimpse Inside and Rebecca @ The Crafted Sparrow!
Linking up to these parties:
{W}
{TH}
A Glimpse Inside
House of Hepworths
{F}
Nap Time Crafters
{M}
Homemaker on a Dime


I found the same farm table on Pinterest. But love the one you guys built! My husband and I want to build the one I found on Pinterest but it is a major project that we will take on someday :)
ReplyDeletexo,
Allison
http://barretts1234.blogspot.com/
We have conducted a comparison check on our farmhouse dining tables with other manufacturers of the same farmhouse dining tables in the UK and USA and tested the quality and thickness of their tabletop and leg features. And verified the quality to be less than equal than our product. Wholesale Farm House Table
DeleteLove this!! Love that you guys make it look pretty easy too! :)
ReplyDeleteLove it!! I am obsessed with the farmhouse tables, I found one I fell in love with at an antique store but it was $800! No way
ReplyDeleteRobin I love what you did with that table!! Such a good idea. You and CJ are definitely talented with building and refinishing things. Love the blog!
ReplyDeleteAh!!! You made the one thing that I have been dying to make!!!! I love it. It turned out fantastic!
ReplyDeleteGreat job!! It looks fab and yay for not letting tools/building get in your way of owning your own farmhouse table. My hubby and I are slowly getting better at building but you are right it takes the right tools.
ReplyDeleteI'm dying for a farmhouse table myself but our current table is still in good shape (and I don't hate it) so it will stay for now.
Thanks so much for following my blog, new follower here as well. :)
xoxo,
Melissa
WOW! This is such a beautiful transformation - luv it! Thanks so much for following my blog today - am following you back ;) Have a great week! Heather
ReplyDeleteThat is gorgeous and something I think Hubby and I could do..
ReplyDeleteFantastic and so simple!
ReplyDeleteIt looks fabulous! Awesome job!
ReplyDeleteThanks for linking up to this week's Catch a Glimpse party! I'll be featuring this tomorrow!
Thank you Allison! I am so excited that you will be featuring it!!!!
DeleteThis is such a beautiful table!
ReplyDeleteThank you so much for linking up to Mauvin' Monday on VintageMauve.com
ReplyDeleteCheers,
Jessica
Fantastic project! Your table is gorgeous! Love that you were able to do it for so cheap, too. :-) Visiting you from It's Overflowing. I'm now following and look forward to seeing more of your awesome transformations. Have a great night!
ReplyDeleteSharla
That is terrific! What a great job you've done, congratulations. I'm your newest follower. Thanks so much for your lovely comment on my table and for following :)
ReplyDeleteAmazing. I love the look. I'm think about making a coffee table using that technique. I'm a new follower.
ReplyDeleteThis is freakin' awesome! Love it! Great job... I am your newest follower! :)
ReplyDeleteFeatured you today, you can check it out here! Thanks again for linking it up, it's fantastic!
ReplyDeletehttp://thecraftedsparrow.blogspot.com/2012/05/birchbox-love.html
This is AWESOME!!!!! I LOVE IT!!!! I am pinning this!
ReplyDeleteIts a bunch of information on DIY Farmhouse Table like video, images and also the informative article. Thanks for sharing...
ReplyDeleteFarm Tables
very nice job.
ReplyDeleteI’m so glad u posted that! I was going to say something along those lines.
ReplyDeleteTessa Furniture for Sale Melbourne